> For the complete documentation index, see [llms.txt](https://doc.thordata.com/doc/llms.txt). Markdown versions of documentation pages are available by appending `.md` to page URLs; this page is available as [Markdown](https://doc.thordata.com/doc/proxies/high-bandwidth-proxies/user-and-pass-auth.md).
# User & Pass auth
Thordata **High-Bandwidth Proxies** is built on real residential IPs with no traffic limits, providing efficient and reliable solutions for continuous, high-frequency data request scenarios.
This guide provides key details and procedures for accessing Thordata's **High-Bandwidth Proxies** service via **username/password** authentication.
{% stepper %}
{% step %}
### Register & Log in
Visit the [**Thordata website**](https://www.thordata.com/), complete account registration, and log in.
{% endstep %}
{% step %}
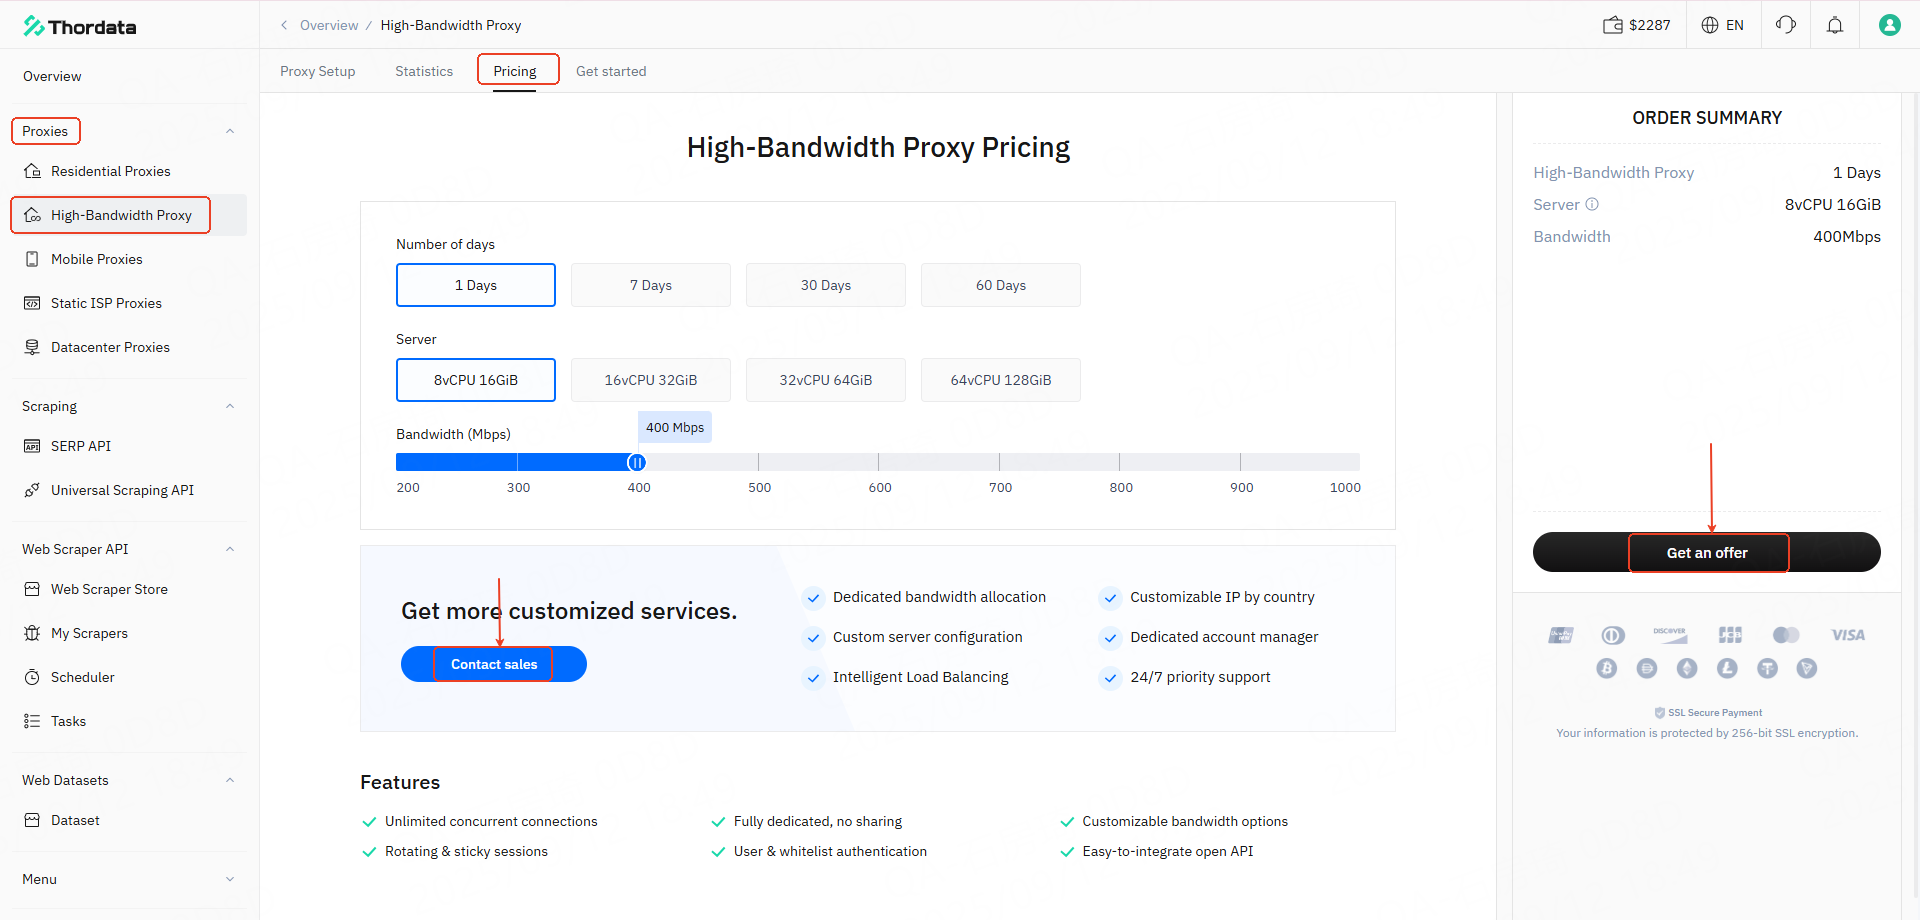
### Get an offer
Navigate within your dashboard to: **Proxies → High-Bandwidth Proxies → Pricing**.**Review your required configuration and contact sales for a quote.**
{% endstep %}
{% step %}
### **Servers List**
① After purchase completion, navigate to **Proxies** → **High-Bandwidth Proxies** →**Proxy Setup**→**Servers** to view activated servers.
② Filter specific servers by:
* selecting server configuration, Bandwidth, or Status
* Clicking **Search.**
③ Server details include:
* **Configuration**、**Bandwidth**、**Type**、**Expiration time** and **Status**
④ **Operation** details include
* **Monitor**: Click to navigate to the server monitoring details page.
* **Upgrade**: Click to modify and upgrade the server's configuration.
* **Restart**: Click to restart the server.
* **Renew**: Click to open the server renewal dialog.
{% endstep %}
{% step %}
### Proxy User Setup
#### Create an Account
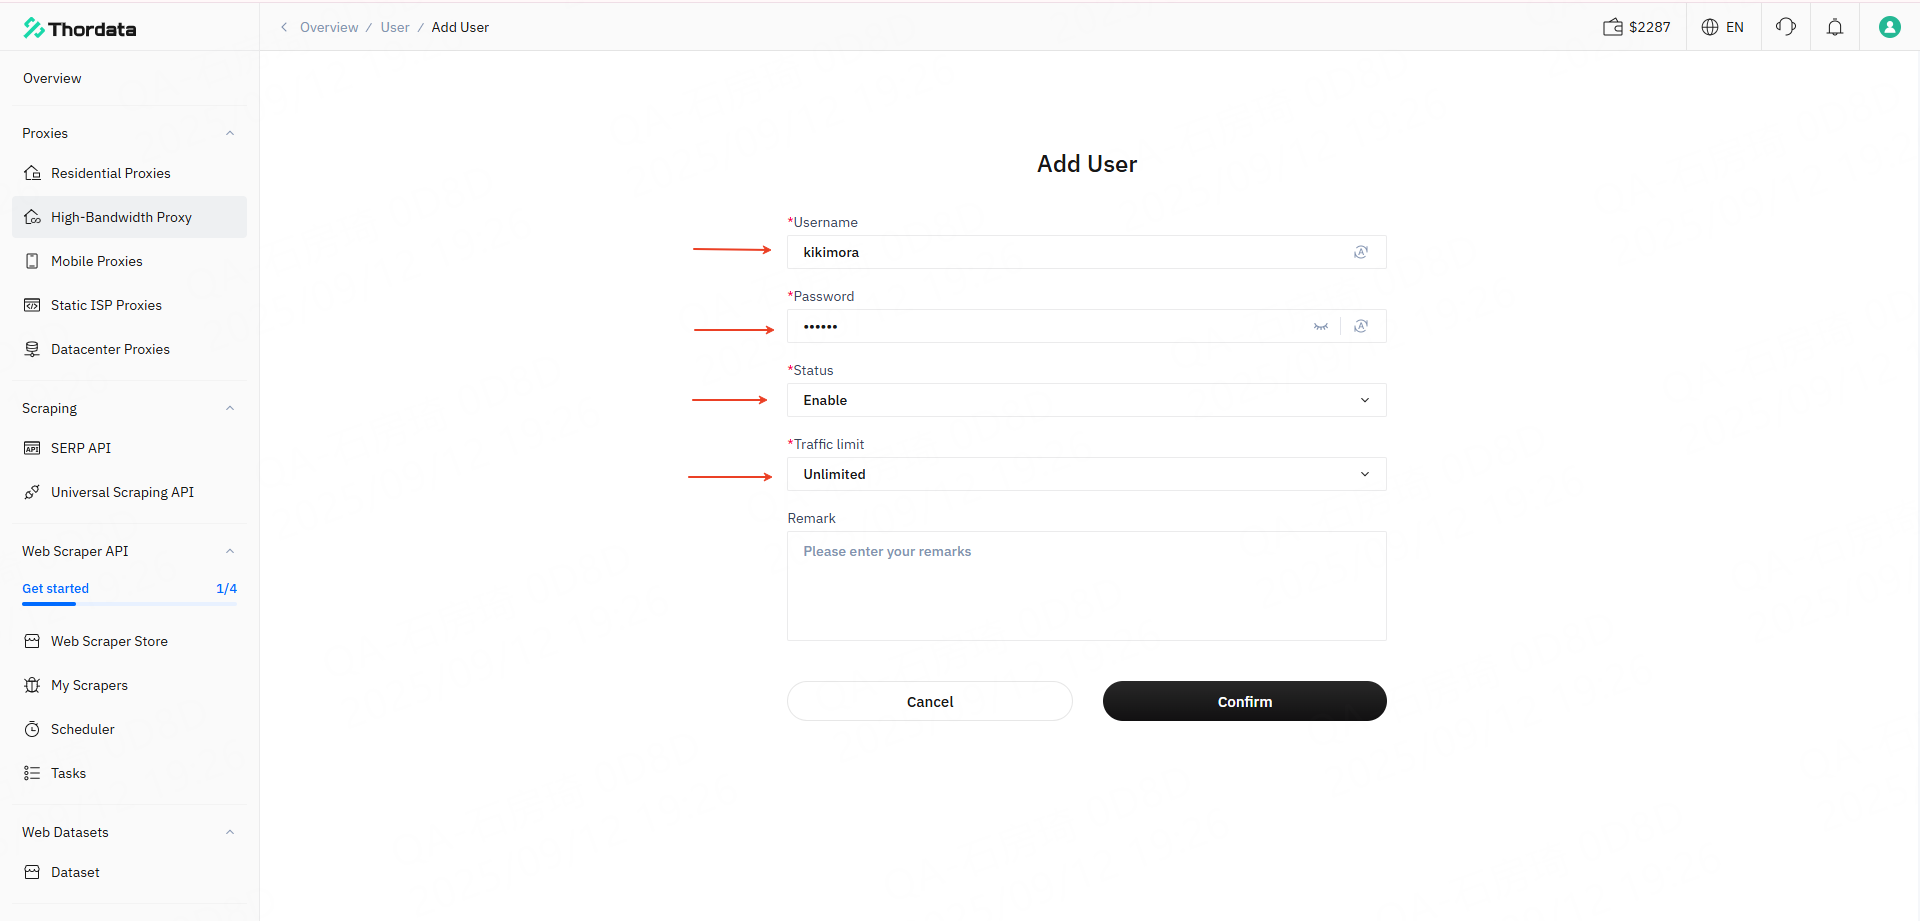
In the user dashboard, navigate to: **Proxies** → **High-Bandwidth Proxies** → **Proxy Setup** → **Users**. Click **Add** to create a new proxy user account.
{% hint style="success" %}
For quick setup: Use **Quick Add** to auto-generate a username and password
{% endhint %}
After clicking **【Add】**, configure the following:**Username**、**Password**、**Status** (Enabled / Disabled)、**Traffic Limits** (Unlimited / Limited)。If Limited*:* Specify the **Traffic Cap (MB).**
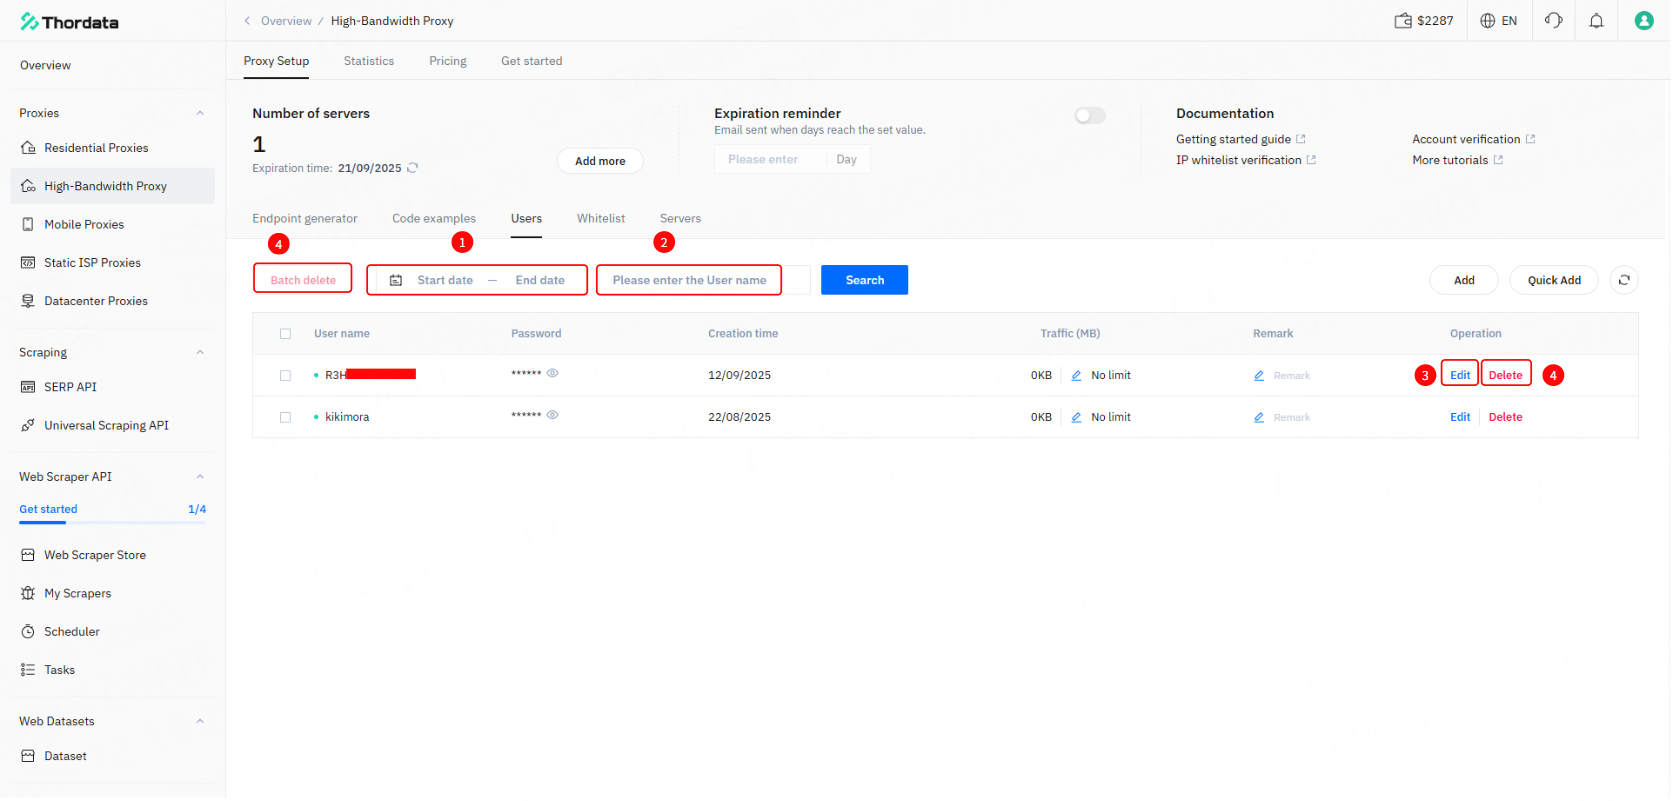
#### Manage Accounts
① **Filter** by Date: Set start and end dates to find accounts created within a specific period.
② **Search** by Username: Enter a username to locate a specific account.
③ **Edit** Account: Click Edit to update the username, password, status, usage limits, or notes.
④ **Delete** Accounts:
* Single Account: Click **Delete** within the edit view.
* Multiple accounts:: Select multiple accounts and use **Batch Delete.**
{% endstep %}
{% step %}
### Generate Proxy Endpoint
① Navigate to: **Proxies** → **High-Bandwidth Proxies** → **Endpoint Generator**.
②**Choose servers:**Select your target server
③**Authentication method**: Select 【User】,then choose a proxy user from the username dropdown.
* If no account exists, click **【Add Now】** to create one.
④ **Location settings**:
Manual override: Use dropdowns to select Continent, Country/Region, State, City, or ISP.
Refer to the [**Location Settings**](/doc/proxies/high-bandwidth-proxies/location-settings.md) for detailed instructions.
⑤ **Session Settings**:
* Rotating Session: Automatically switches IPs with each request (ideal for high anonymity).
* Sticky Session: Maintains the same IP for 1-90 minutes (ideal for session continuity).
See [**Session Control** ](/doc/proxies/high-bandwidth-proxies/session-control.md)for details.
**⑥ Submit Request**:
Send a request with authentication credentials to [**https://ipinfo.thordata.com**](https://ipinfo.thordata.com) via the proxy endpoint to start using Thordata’s proxy service.
Refer to the [**Making Requests**](/doc/proxies/high-bandwidth-proxies/making-request.md) guide for detailed instructions.
```
curl -x "https://td-customer-Username-sessid-123456-sesstime-90:Password@t.thordata.online:9999" "https://ipinfo.thordata.com
```
⑦ **Output Format**: The system generates a single-string proxy credential:
`ProxyAddress:ProxyPort:ProxyUsername:ProxyPassword`
Select your preferred Output Format, set the Number of Proxies, specify the Connection [**Protocol**](/doc/proxies/high-bandwidth-proxies/protocols.md), then Generate & Activate.
{% hint style="warning" %}
**Your Proxy Authentication Username differs from your Dashboard Management Username and cannot be used interchangeably.**
{% endhint %}
{% endstep %}
{% step %}
### Usage Statistics
Navigate to: **Proxies → High-Bandwidth Proxies → Statistics.**
Filter data by: Time Period、configuration、Identity Type (Account or IP Whitelist)、Account Level (Master Account or Specific Sub-Account)、Region、Target Domain and Timezone
{% endstep %}
{% endstepper %}